ToDO’s vor dem Beginn
- Öffentlicher DNS-A-Eintrag, welcher auf das WAN-Interface der Firewall verweist. (z.B.: vpn.pgi.at)
- WAN to Zywall Regel, mit den Diensten “AH, ESP, IKE & NATT”.
- IP-Bereich für die VPN-Clients definieren. (z.B.: 192.168.80.10-90)
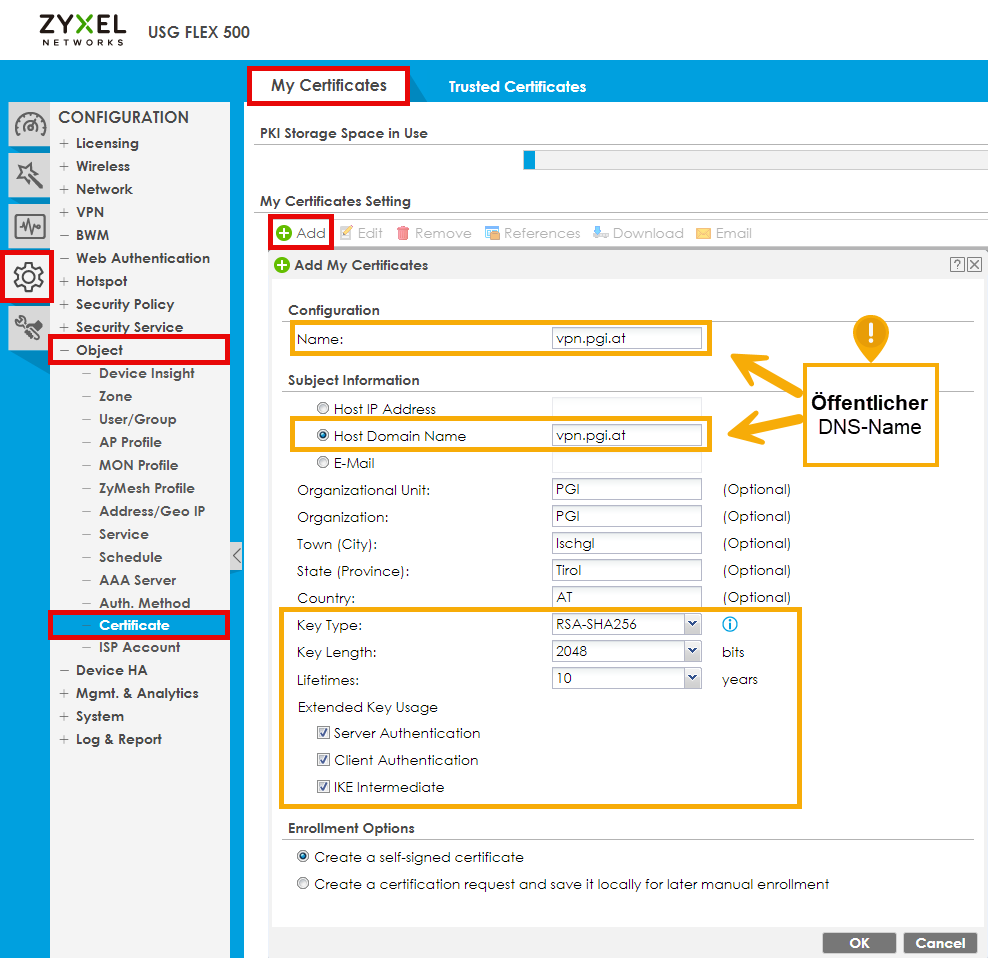
Selbstsigniertes Zertifikat erstellen
- Name & Host Domain Name mit dem erstellen DNS-Eintrag ausfüllen.
- Lifetimes so lange wie möglich.
- Extended Key Usage alle drei auswählen.
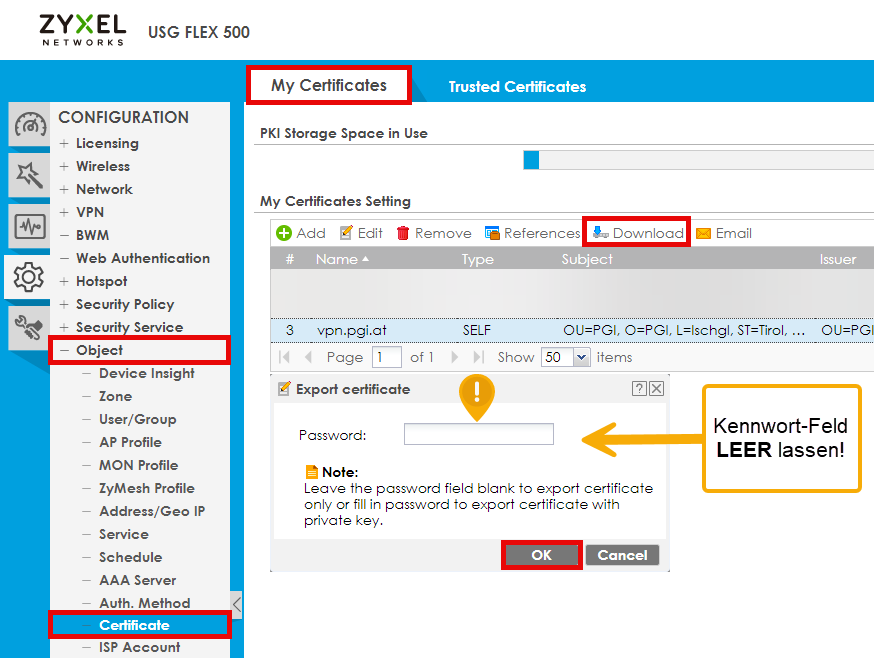
Nachdem das Zertifikat generiert worden ist, muss es ohne den Privaten Schlüssel exportiert & heruntergeladen werden. Dieses wird später für die Setup-Generierung benötigt:
Objekte erstellen
Adressen
GUI
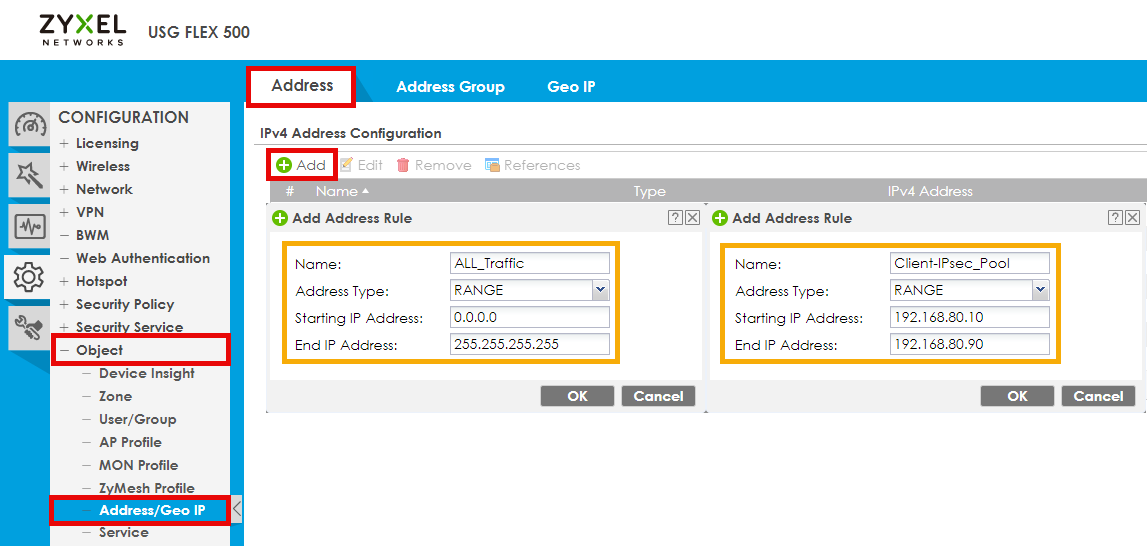
Benötigt werden zwei Adress-Objekte: ALL_Traffic & Client-IPsec_Pool
| Name: | ALL_Traffic | Client-IPsec_Pool |
|---|---|---|
| Address Type: | RANGE | RANGE |
| Starting IP Address: | 0.0.0.0 | 192.168.80.10 |
| End IP Address: | 255.255.255.255 | 192.168.80.90 |
CLI
address-object ALL_Traffic 0.0.0.0-255.255.255.255
address-object Client-IPsec_Pool 192.168.80.10-192.168.80.90
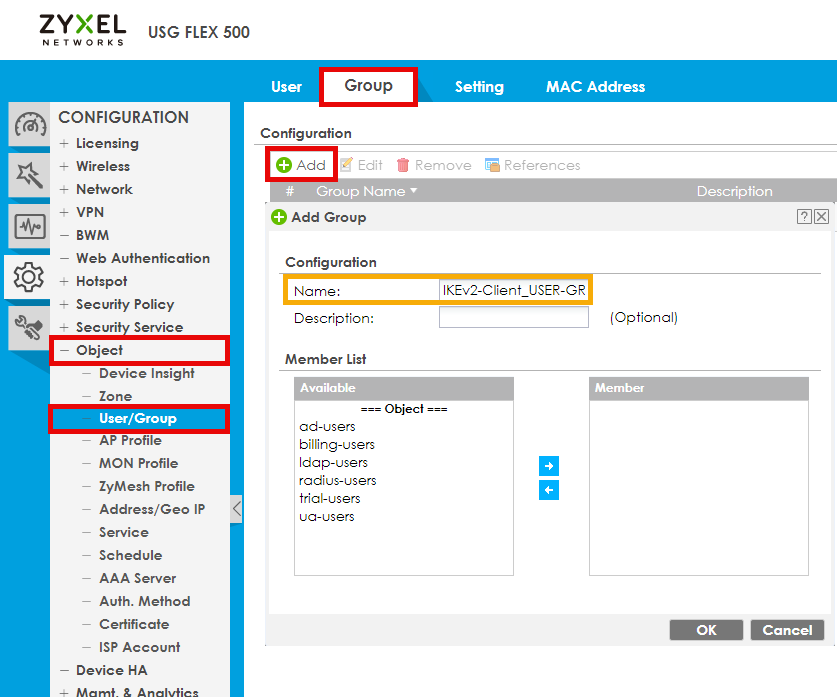
Client-Gruppe
- Name:
IKEv2-Client_USER-GROUP
GUI
CLI
groupname IKEv2-Client_USER-GROUP
VPN-Verbindung anlegen
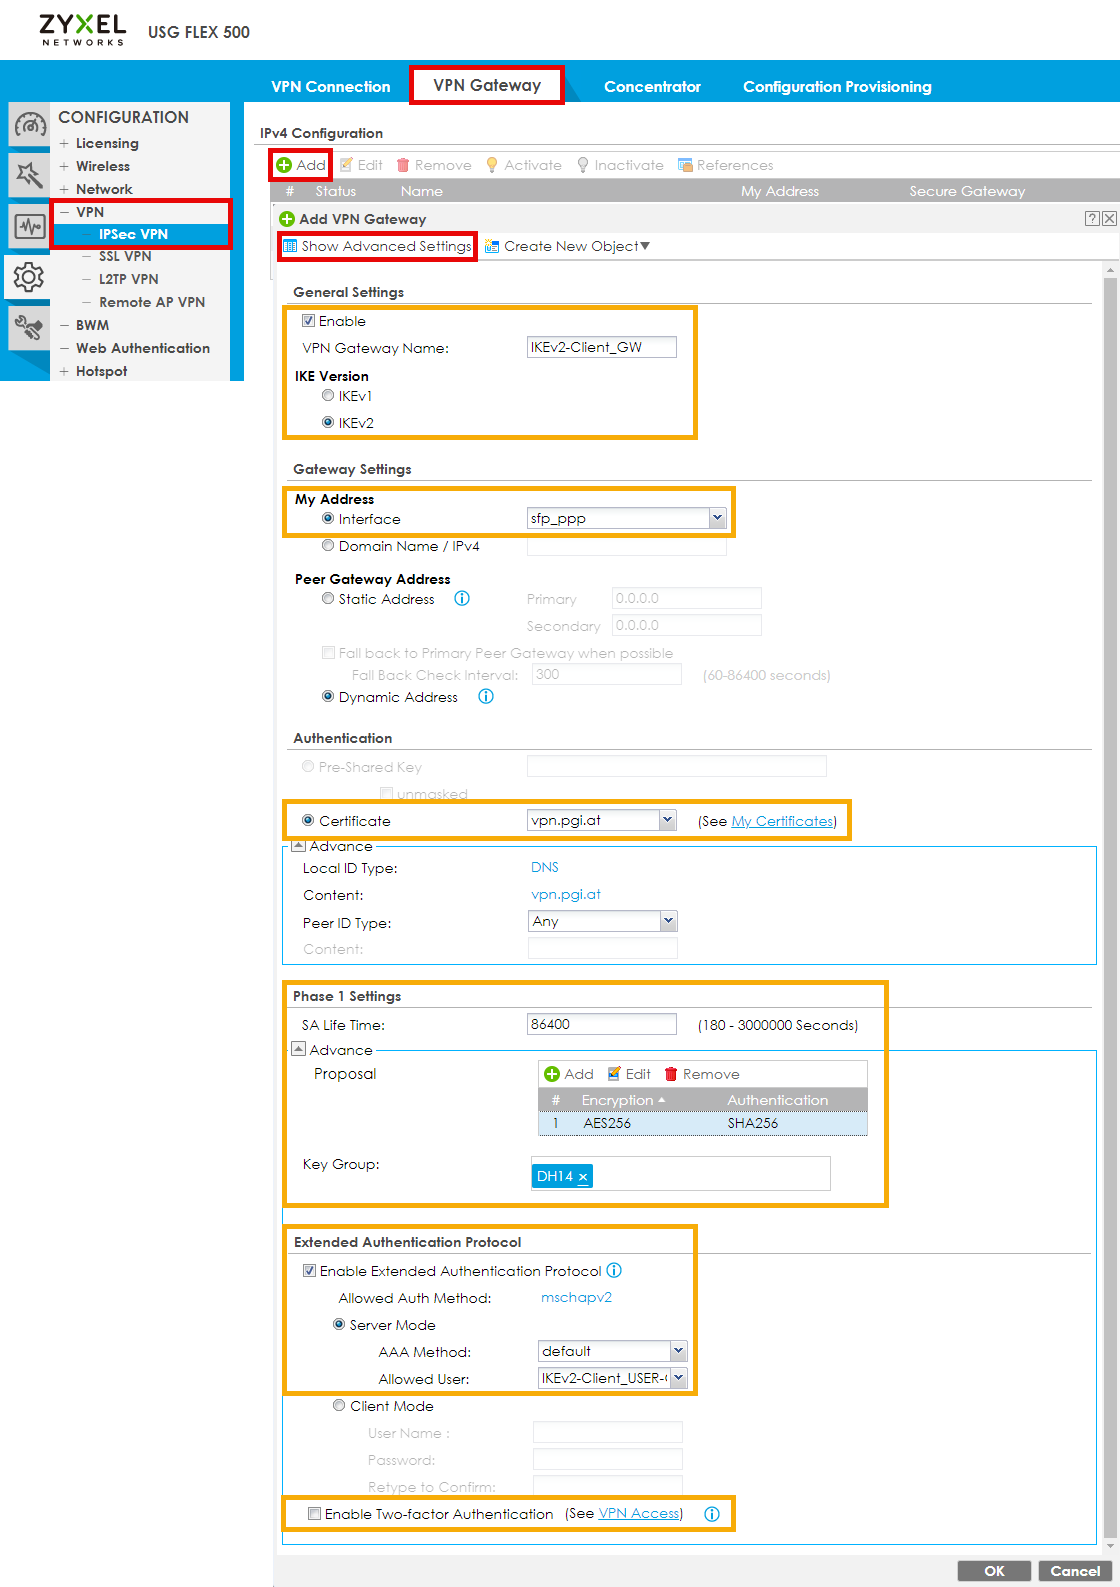
Gateway
| Punkt | Einstellung |
|---|---|
| Enable: | True |
| VPN Gateway Name: | IKEv2-Client_GW |
| IKE Version: | IKEv2 |
| My Address: | WAN-Interface |
| Peer Gateway Address: | Dynamic Address |
| Authentication: | Certificate –> VPN-Zertifkat |
| SA Life Time: | 86400 |
| Proposal: | AES256 / SHA256 |
| Key Group: | DH14 |
| Enable Extended Authentication: | True –> Server Mode |
| Allowed User: | IKEv2-Client_USER-GROUP |
| Enable Two-factor Authentication | False |
GUI
CLI
Zeilen, welche angespasst werden müssen, beginnen mit einer #.
ikev2 policy IKEv2-Client_GW
 activate
 #local-ip interface wan1
 peer-ip 0.0.0.0 0.0.0.0
 authentication rsa-sig
 #certificate vpn.pgi.at
 #local-id type fqdn vpn.pgi.at
 peer-id type any
 fall-back-check-interval 300
 lifetime 86400
 group14
 transform-set aes256-sha256
 dpd-interval 30
 eap auth-method mschapv2
 eap type server default user-id IKEv2-Client_USER-GROUP
 no twofa-auth
 exit
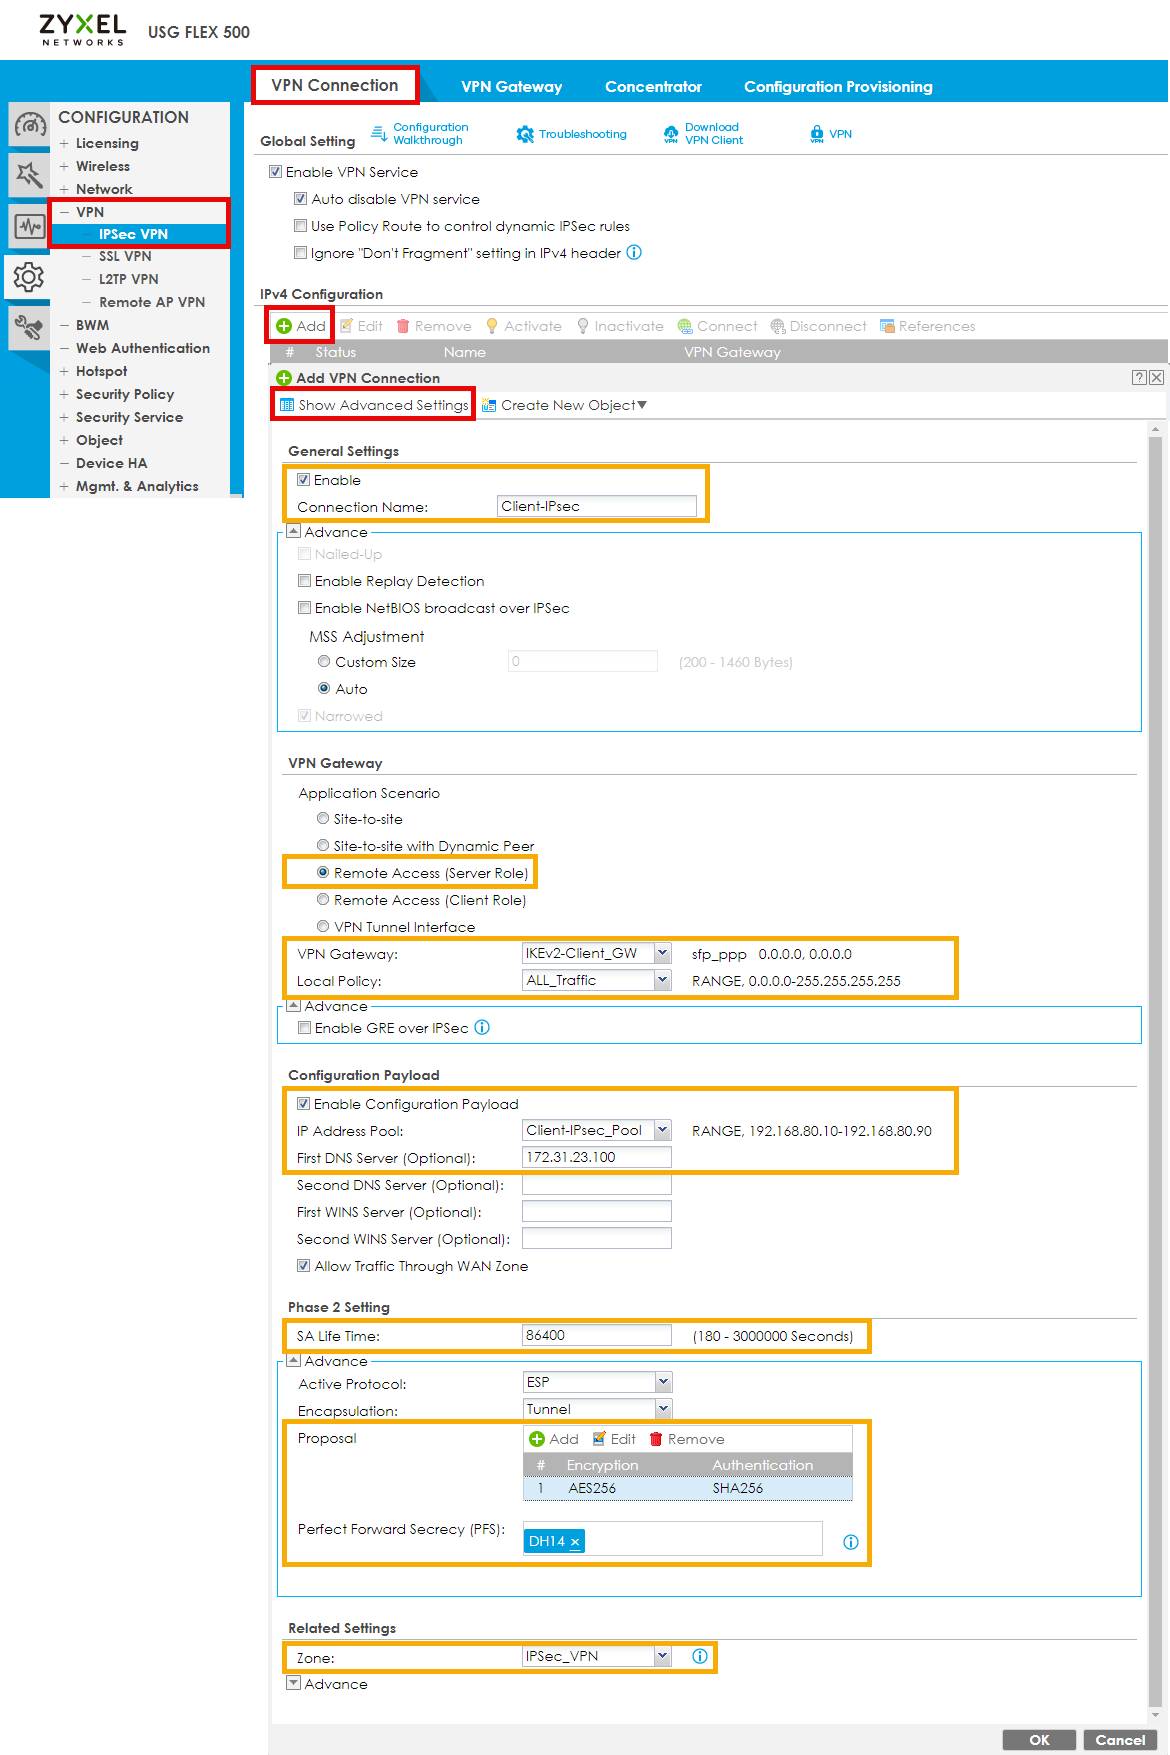
Connection
| Punkt | Einstellung |
|---|---|
| Enable: | True |
| Connection Name: | Client-IPsec |
| Application Scenario: | Remote Access (Server Role) |
| VPN Gateway: | IKEv2-Client_GW |
| Local Policy: | ALL_Traffic |
| Enable Configuration Payload: | True |
| IP Adress Pool: | Client-IPsec_Pool |
| First DNS Server (Optional): | z.B.: IP AD-Controller |
| SA Life Time: | 86400 |
| Proposal: | AES256 / SHA256 |
| Key Group: | DH14 |
| Zone: | IPSec_VPN |
GUI
CLI
Zeilen, welche angespasst werden müssen, beginnen mit einer #.
crypto map Client-IPsec
 activate
 adjust-mss auto
 ipsec-isakmp IKEv2-Client_GW
 scenario remote-access-server
 encapsulation tunnel
 transform-set esp-aes256-sha256
 set security-association lifetime seconds 86400
 set pfs group14
 local-policy ALL_Traffic
 remote-policy any
 no conn-check activate
 configuration-payload-provide activate
 configuration-payload-provide address-pool Client-IPsec_Pool
 #configuration-payload-provide first-dns 172.31.23.100
 exit
!
zone IPSec_VPN
 crypto Client-IPsec
 exit
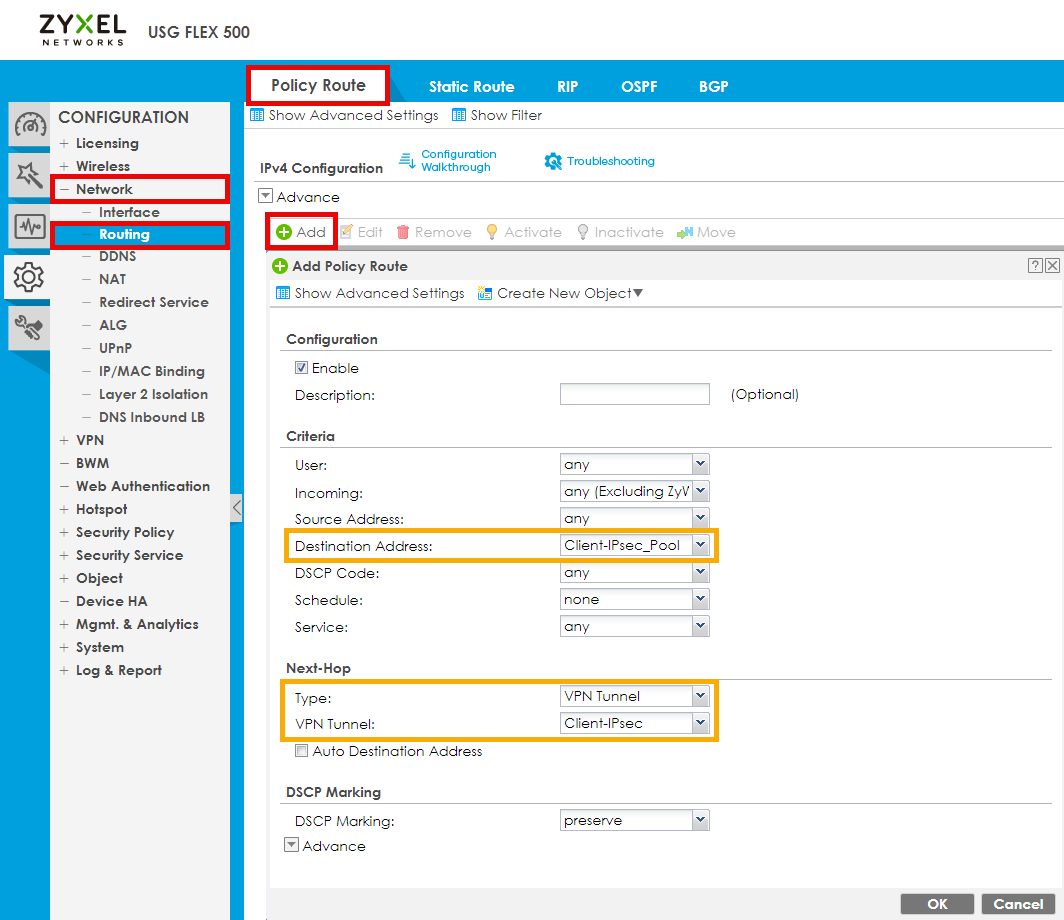
Policy Route
| Punkt | Einstellung |
|---|---|
| Destination Address: | Client-IPsec_Pool |
| Type: | VPN Tunnel |
| VPN Tunnel: | Client-IPsec |
GUI
CLI
Zeilen, welche angepasst werden müssen, beginnen mit einer #.
Überschreibungsgefahr! Policy-Nummer unbedingt anpassen!
#policy 1
 destination Client-IPsec_Pool
 dscp any
 next-hop tunnel Client-IPsec